Sunday, October 18, 2015

Java: When the compiler crashes the plane

Software design principles on compiled programming languages tend to have one rule in common; Compiler errors over runtime errors. A religiously followed rule. It's a dogma (although based on legitimate reasons). You should always program in a way that most errors would be reported from the compiler and your logic tested by unit testing. Sometimes little things slip through though.

The following scenario describes an easy to do mistake in Java and highlights some good practice to avoid crashing that plane.

Pre-requisites:


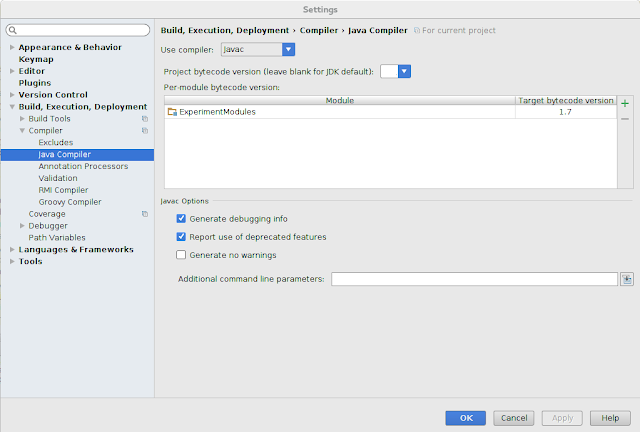
Open intelliJ and setup a java project with the following (adapt to match your system):


The example code is this:

import java.util.concurrent.ConcurrentHashMap;


public class FunWithMaps {

    public static void main(String[] args) {
        ConcurrentHashMap map = new ConcurrentHashMap();

        map.put("1", 1);

        System.out.println(map.keySet().getClass());
    }
}

Run. You'll get the following error:

Exception in thread "main" 
java.lang.NoSuchMethodError: 
java.util.concurrent.ConcurrentHashMap.keySet()Ljava/util/concurrent/ConcurrentHashMap$KeySetView;

So, the compiler used java 8 API and didn't complain despite the fact that we set it 
to compile to java 7. But that was the bytecode version and the java 8 API that was in
the compile classpath didn't cause any problems. 

Consider that this scenario is what the continuous integration (CI) might have. 
This imaginary CI system builds your production level code but you - as a programmer - 
have no control over it. Then, the ConcurrentHashMap code would succeed on your IDE 
(because you would be compiling with java 7 targeting java 7) but the CI would be compiling 
java 8 generating java 7 bytecode without having java 7 API in the classpath. The runtime environment
 would use java 7.

You wouldn't know, the compiler wouldn't know, and the crash would rely on the testing environment
 to be caught. That scenario might cause you a late runtime crash on a live environment.

Let's see the bytecode a bit and see if we get what we expect, i.e. a call to the keySet method that returns the KeySetView.

Open your generated class file with Java bytecode editor.


On line 13, this is quite obvious. When running with java 7 you don't get any error until line 13 is executed by jvm and it tries to find that method, which doesn't exist on java 7. So how can we avoid this with a bit of good practice (although, having in compile time classpath an API of a different version that the one on runtime is the most obvious mistake that needs fixing). But we want our code to be as safe as possible and work even in situations where simple API changes won't affect it.

Let's change the left hand side to the interface definition. The Map.

 import java.util.Map;
import java.util.concurrent.ConcurrentHashMap;


public class FunWithMaps {

    public static void main(String[] args) {
        Map map = new ConcurrentHashMap();

        map.put("1", 1);

        System.out.println(map.keySet().getClass());
    }
}

Before running it, make a build and see the bytecode. It's now a bit different.


As expected, the compiler now generated the bytecode according to the interface visibility of the method.
If you run it now with java 7 it will not fail and will output:
class java.util.concurrent.ConcurrentHashMap$KeySet

Switch run configurations to jre 8. Run again and you get what you expected:
class java.util.concurrent.ConcurrentHashMap$KeySetView


It's always a good practice to define your variables with the highest superclass or interface 
possible, especially if you are using an external API (which is pretty much always the case). 
Interfaces rarely change or at least they change less frequently from implementation code.


That should as well settle the argument of using on the left hand side the instantiating class 
in the variable definition or their superclass (interface they implement).
Sunday, August 30, 2015

Programming with the metric system - Draft ideas

In a paper called 'Software Development for Infrastructure' Bjarne Stroustrup presented the new features of C++11 with some interesting examples. The most fascinating one was derived from the NASA accident in September of 1999. The root of the accident was a mismanagement of the metric system units due to a poorly designed API that basically was relying on comments.

I'm currently working on a project that requires managing metric units correctly. The language used is Java. Also, I have developed an external, open source library, that provides the essential API for managing metric units. It's a very young project so it supports a very small range of metric units (only those needed by the bigger project) but it is sufficient to demonstrate the basic design principles for managing metric units.

You can find the library here.

Let's examine it's usage in a few examples. Let's say we want to keep track of velocity.

Actually, this is already provided in the library.

public final class VelocityUnit {
    public final DistanceUnit DISTANCE_UNIT;
    public final TimeUnit TIME_UNIT;

    public final double DISTANCE_VALUE;

    public VelocityUnit(DistanceUnit distance_unit, TimeUnit time_unit, double distance_value) {
        DISTANCE_UNIT = distance_unit;
        TIME_UNIT = time_unit;
        DISTANCE_VALUE = distance_value;
    }

    public VelocityUnit convert(DistanceUnit distance_unit, TimeUnit time_unit) {

        if (distance_unit == DISTANCE_UNIT && TIME_UNIT == time_unit)
            return this;

        double newTimeUnitWorthOfCurrentTimeUnit = 1/time_unit.convert(1, TIME_UNIT);

        double newTotalDistance = DISTANCE_VALUE*newTimeUnitWorthOfCurrentTimeUnit;

        double newDistanceValue = distance_unit.convert(DISTANCE_UNIT, newTotalDistance);

        return new VelocityUnit(distance_unit, time_unit, newDistanceValue);

    }


    public String getMetricSignature() {
        return DISTANCE_UNIT.signature + "/" + TIME_UNIT.signature;
    }

    public String toString() {
        return String.format("%.2f%s",DISTANCE_VALUE, getMetricSignature());
    }

}
In the constructor, the programmer passes the metric unit of the distance and the time
This implementation is quite simple, so it gets the difference in distance as a third parameter 
and it assumes the value of time is a single unit of whatever metric is passed. 
You can then convert it to use different distance units or time units accordingly. 

But that doesn't tell much about differences between two people, what about hiding the 
information from the third party developer? Let's see another example now of how the 
developers will get what they expect by interacting with a black box class. In the example below, 
the developer can put values in whatever metric unit they like and get it back in whatever 
format they like. The magic is by telling the class to explicitly work with only one metric unit.

package com.vaslabs.units.examples;

import com.vaslabs.units.DistanceUnit;

public class ExampleDistanceCalculation {

    private final DistanceUnit PREF_DISTANCE_UNIT = DistanceUnit.METERS;

    private double pointA;
    private double pointB;

    public ExampleDistanceCalculation() {

    }

    public void setPointA(double value, DistanceUnit distanceUnit) {
        pointA = DistanceUnit.PREF_DISTANCE_UNIT.convert(distanceUnit, value);
    }


    public void setPointB(double value, DistanceUnit distanceUnit) {
        pointB = DistanceUnit.PREF_DISTANCE_UNIT.convert(distanceUnit, value);
    }

    public double getDistance(DistanceUnit distanceUnit) {
        return distanceUnit.convert(DistanceUnit.PREF_DISTANCE_UNIT, (pointB - pointA));
    }
}
The ExampleDistanceCalculation will work with meters while the third party developers can 
choose their own metric system. For instance, you can have a sensor and some software that 
give you values in centimeters. You can have a class like the above as a middleware 
(with CM instead of METERS) and allow all the other developers to work on the metric unit of 
their preference. It is also useful when delivering to the userland, as users may have different 
preferences on metric units.

Saturday, April 26, 2014

Pi-web-agent Quokka

The pi-web-agent version 0.2 codenamed Quokka has been released since the 24th of April. It provides a better user interface which is faster and more interactive and some extra cool features such as:

  • Pi camera controller (take snapshots or watch a live stream).
  • File manager - browse and download files. 
  • Radio - stream from internet radio or other audio by providing the URL.
The firewall management was also improved which allows now to control access from various protocols and IP addresses.

A video that demonstrates the application:


How to get it:

Download the application from pi store: http://store.raspberrypi.com/projects/pi-web-agent

Give a like to the developers and their project: https://www.facebook.com/pages/Raspberry-Pi-Web-Agent/481006072007776

Monday, April 7, 2014

The next day for your business: Windows XP?

I should have written this article about a year ago to give to someone that cares the time to plan ahead. Frankly, I don't care much. If you have a business and you are technologically impaired it's your fault.

Computers are not an unnecessary "shit that I have to buy, just don't spend much". They are your records, data center, analysis tools and your professional image all in one box. When you've installed or bought computers with Windows XP you did the right thing. They were the best you could find, a value for money deal like no any other. The main reason for that was the Microsoft monopoly. Linux distributions were good but you couldn't find the tools you needed easily, and Apple oh Apple. . .

 But in 2014 things are different. You can have a free office solution that may lack the User Interface eye candy of Microsoft's but it does the job and guess what: it's free. Also you have a large range of free Linux based Operating Systems you can use. People tend to agree that Ubuntu or Linux Mint are the most user friendly ones.

But if you feel that open source and free software is "insecure and vulnerable and Jesus everyone can see the code, is that even safe?" you can buy from Red Hat and have the support you used to have with Microsoft. Which in fact you didn't have, but this time it will be a real thing.

 So before upgrading to Windows 7 or 8 (Jesus are you thinking "what about Vista?" now?) or buying new machines, think about spending a fifth of that money to install a free operating system (which is also safer) and train your employees to use them. If they can't learn it, fire them and get new ones.

 So what are the benefits of Linux based Operating Systems?

 Remember when you needed to update manually Firefox, Google chrome and a bunch of other applications that weren't Microsoft's? Well, no more. Every application (assuming you've installed them correctly which requires an IQ roughly above the 20's) gets updated automatically along with the system updates. And guess what: If you screw up or something breaks, you can roll back (again, if you have the IQ index mentioned before).

"But why do I need to keep updating?". Well that's the reason you are switching from XP to something else right? Anyway, most of your employees play solitaire or they are on Facebook. So get them something that's free and actually works.

Friday, December 27, 2013

The pi-web-agent

Remember the Hackmanchester winning project pi-web-agent? Well, we released the first version of the pi-web-agent in the pistore. Here is the wiki page of the project as generated and exported from our github repository


pi-web-agent

The pi-web-agent is a web application that aims to provide a more user friendly way of interacting with the Raspberry Pi and performing basic tasks by eliminating the need of using the command line directly.

How to use

After starting the pi-web-agent service by executing run.sh or sudo /etc/init.d/pi-web-agent start , you can access the application with your browser via either https://raspberrypi:8003 or https://ip_address_of_your_pi:8003 if your internet router does not resolve hostnames to IPs. To access the application inside your Pi just access the local host without https: http://127.0.0.1:8004

Provided functionalities

The web application currently provides the following functionalities:

  • Firewall management by controlling the iptables.
  • A package management system for installing useful applications easily.
  • Service management for starting or stopping services
  • Update management for updating the underlying Linux distribution with a simple click
  • GPIO management for controlling the pins on the Raspberry Pi (special thanks to the author of wiringPi for his excellent open source program)
  • General purpose information of the system (memory usage, disk capacity, ip, cronjobs, swap usage)
  • Tightvnc is provided, by setting up a vncboot service and enabling users to use tightvnc java applet to access the system by the tightvnc viewer (special thanks to tightvnc for their open source tightvnc client)
  • Power management for rebooting or powering off the system with a simple click

Firewall management

Currently the Firewall management section displays the current state of the iptables. Enabling input for altering the iptables state is under development

Package management

The package management provides a list with useful packages and a short description. You can request an uninstall or install of the application by simply clicking on the switch button.

Service management

Service management allows you to stop or start services. Only services with known state are shown.

Update management

The update management aims to arrange or the hassle about updates for you. It takes care of checking for updates and notifies you on the live information feed. The update section also provides information of weather there is an update or not and if yes, it provides a list of packages with there description that need update. The update can be initiated with a simple click of a button at the end of that list.

GPIO management

The GPIO management provides access to the General Purpose Input Output pins on the Raspberry Pi. You can convert a pin to input or output and activate outputs. Currently only GPIO0-GPIO7 pins are available. The solution is under development to provide more functionality on the second release.

VNC

VNC is very important because most users want to access their pi from their laptop and have an image of the desktop in their screen. That's why the application has the tightvnc server as a dependency and provides the tightvnc client java applet. The whole vnc solution is pre-setup and only clicking at the vnc section should work. The tightvnc service on the RPi should be started manually because you need to setup a password.

Requirements

Currently the web application agent supports the Raspberry Pi with Raspbian installed. Any debian based Linux distribution should also work but is not thoroughly tested yet.

Authors

Vasilis Nicolaou, Angelos Georgiadis, Georgios Chairepetis, Kyriacos Georgiou and Maria Charalambous

License

GPLv2. Imported projects have their own license.

Developer information

Please consult the README file in order to setup an environment for testing purposes of the application. Note that architecture specific code won't work (just the GPIO for the moment). The application is based on the micro-CernVM web appliance agent developed at CERN by Vasilis Nicolaou and documentation section contains documents for that web application but are highly relevant to the forked version (the pi-web-agent)

Documentation

Report (only relevant information of the web application, ignore update management section)

Presentation (first 9 slides)

Follow usr/share/pi-web-agent/doc for documentation on key python modules.

Thursday, January 31, 2013

A Dropbox client for the raspberryPI

Overview

Raspybox is a minimalistic but powerful dropbox client written in python for the RaspberryPI.

How to use it

There are three forms that the program can be executed. The simplest is the graphical way. First you have to execute raspberryDropy.py and type login. Follow the instructions and when you finish press ctrl+D to exit. Now you can use it in any of the three forms.

Setting things up

You need to install the dropbox sdk for python (which can be found in dropbox developer page) and create your own app. Download all the files from the file directory of this project and place them in a directory. Create an app for the whole dropbox and copy paste the keys in raspberryDropy.py accordingly.

User Interfece

To execute the user interface simply type ./raspberryDropy_gui.py . The user interface should come up after a few seconds.
You can also use some shortcuts instead of the menu:
For upload press insert key.
For delete press delete key.
To refresh press F5
To navigate through your directories use the arrow keys and enter or double mouse click to either enter a directory or download a file.
There will be some messages in the console, don't worry about them. If the program crashes send the output as a bug report to the developer. This is because it is the initial version, so it might have some serious bugs.

Dropbox command line

You can also execute the raspberryDropy.py and use the dropbox from the command line. Type help to view the necessary commands.

Alternative command line

Because the RaspberryPI is very useful when using scripts and command line fire and forget programs such a functionality is supported. Instead of running ./raspberryDropy.py to access command line, you can supply a dropbox command as argument. Then the program will start-up execute the command, display the output and die. Be ware that the cache can't work on such situations. You can modify it to keep a cache on a file instead of the memory or use your own in your script.
This part however needs further development and consideration, so the command line can be used efficiently and fast enough (for example it makes no sense to run a command for changing directory, it will be of no use for this purpose)

Contribution

Currently the code is not very well commented, but it should not be very difficult to understand it, since it's a small program. However, a commenting will be done soon, I hope. If you want to contribute to this program, please send a request.

Currently, the target groups are developers, testers and PI hobbyists, but anyone can have a go with it.
You can find everything here:   http://sourceforge.net/p/raspybox/wiki/Home/

Wednesday, January 2, 2013

Finding probabilities for RISK

During holidays we find ourselves playing board games. One of the best out there is RISK. During game-play, one might wonder what are the probabilities for each battle scenario. Moreover, if that someone is, well, a geek, he might write a program during game-play to support his army with a little of, em, technology.
So, do we know an equation to find those probabilities? No. Probably we'll find one with a little google search, but why not study it using a more programming method? We have the technology, we know a little bit of programming, so, let's take our chances.

  1. import java.util.Arrays;
  2. public class RiskProbability
  3. {
  4. private static int[] diceThrow(int n)
  5. {
  6. int[] dice = new int[n];
  7. for (int i = 0; i < dice.length; i++)
  8. dice[i] = (int)(Math.random()*6) + 1;
  9. Arrays.sort(dice);
  10. return dice;
  11. }
  12. public enum winner {ATTACKER, DEFENDER, TIE};
  13. private static winner battle(int a, int d)
  14. {
  15. int[] attacker = diceThrow(a);
  16. int[] defender = diceThrow(d);
  17. int aSoldiersLost=0;
  18. int dSoldiersLost=0; 
  19. int j=defender.length - 1;
  20. for (int i = attacker.length - 1; i >= 0 && j >= 0 ; i--)
  21. {
  22. if (attacker[i] > defender[j--])
  23. dSoldiersLost++;
  24. else
  25. aSoldiersLost++;
  26. }
  27. if (aSoldiersLost > dSoldiersLost)
  28. return winner.DEFENDER;
  29. else if (dSoldiersLost > aSoldiersLost)
  30. return winner.ATTACKER;
  31. else
  32. return winner.TIE;
  33. public static void main(String[] args)
  34. {
  35. int experimentSize = Integer.parseInt(args[0]);
  36. int attWins = 0, defWins = 0, ties = 0;
  37. int attStyle = Integer.parseInt(args[1]);
  38. int defStyle = Integer.parseInt(args[2]);
  39. for (int ex = 1; ex <= experimentSize; ex++)
  40. {
  41. winner w = battle(attStyle, defStyle);
  42. switch (w)
  43. {
  44. case ATTACKER: attWins++; break;
  45. case DEFENDER: defWins++; break;
  46. case TIE: ties++; break;
  47. defaultbreak;
  48. }//switch
  49. }
  50. System.out.println("Experiment is with " + attStyle + " attackers and " + defStyle + " 
  51. defenders " + experimentSize + " times");
  52. System.out.println((attWins/(double)experimentSize) + " attackers");
  53. System.out.println((defWins/(double)experimentSize) + " defenders");
  54. System.out.println((ties/(double)experimentSize) + " ties");
  55. }//main
  56. }
Let's explain the code a bit.
Lines 4-11 is the definition of a throw dice function. You specify the number of dice to throw, and a sorted array of the values of each die is returned. Watch out because the dice are sorted in ascending order.

Line 12 is an enumeration to be used for specifying the winner.
Line 13 is the definition of the battle function that takes two arguments, the number of dice the attacker will use and those of the defender as a second argument. Then the diceThrow is called and the battle begins on lines 20-26 until one runs out of dice.
Line 34 is the main method where the battle is initiated for 'experimentSize' number of times using the specified number of dice for each player.
To run this properly you have to pass 3 integer arguments, the experiment size (1000000 should be more than enough), the number of dice of the attacker and the number of dice of the defender. These are the results obtained by using the above program:

$ java RiskProbability 1000000 3 2
Experiment is with 3 attackers and 2 defenders 1000000 times
0.371734 attackers
0.291923 defenders
0.336343 ties

java RiskProbability 1000000 2 2
Experiment is with 2 attackers and 2 defenders 1000000 times
0.227412 attackers
0.448301 defenders
0.324287 ties

$ java RiskProbability 1000000 3 1
Experiment is with 3 attackers and 1 defenders 1000000 times
0.66038 attackers
0.33962 defenders
0.0 ties

$ java RiskProbability 1000000 2 1
Experiment is with 2 attackers and 1 defenders 1000000 times
0.578971 attackers
0.421029 defenders
0.0 ties

$ java RiskProbability 1000000 1 1
Experiment is with 1 attackers and 1 defenders 1000000 times
0.416221 attackers
0.583779 defenders
0.0 ties

$ java RiskProbability 1000000 1 2
Experiment is with 1 attackers and 2 defenders 1000000 times
0.25389 attackers
0.74611 defenders
0.0 ties

So, the next time you'll play RISK, you'll know.